
 |
| Not if I have anything to say about it! Chaosheade the Thrifty Heresiarch to the rescue! |
Hey everyone, welcome to the long awaited Kitbashed Plastic Zoanthrope modeling tutorial, A.K.A. the "I'm about to save you a @#$&load of money on Zoanthropes" tutorial. As you may know I am working on making a null deployment Tyranid army and that means I want to have some Zoanthropes. Being the thrifty gamer that I am, however, I have a problem with paying $25 per model for the 6-9 zoanthropes that I eventually want to have in my collection and I'm not going to even comment on the whole "Finecast" issue and the complaints you see all over the internet. I think that poor dead horse has seen enough abuse already.
Getting back on topic, I decided to try my hand at converting a zoanthrope using an assortment of plastic bits. The first attempt was decent but not great and had several areas that really needed some attention. The second version was a huge improvement over the first and will be the basis for all further conversions. In this post I will be converting my third zoanthrope and documenting the process to show you exactly how I made them and how much money I will be saving compared to buying them at retail prices. All right then, enough with the introductions, jumping right into it after the break.
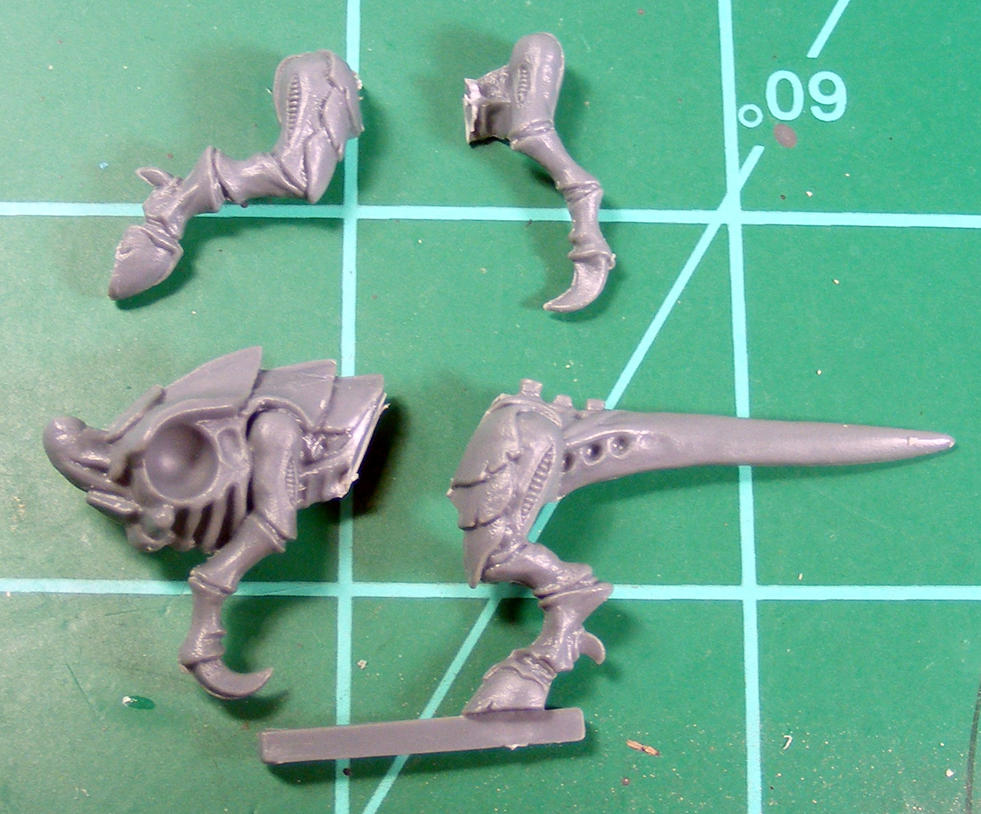
The Bits and Pieces:

- Hormagaunt head. I found that hormagaunt heads work best and you will have plenty of extras there from the hormies you will be stealing the talons from. Alternatives: termagant head or warrior face
- Termagant body. I have plenty of these from buying a couple battleforce boxes. If you need more termagants for your army than you have extra bodies for like me, extra hormagaunts can replace termagants. Just steal a few hormagaunt bodies and throw termagant heads/weapons on them. You will be stealing the hormagaunt heads and talons anyway, so you should have extra bodies. As a bonus it adds variety to your termagants too.
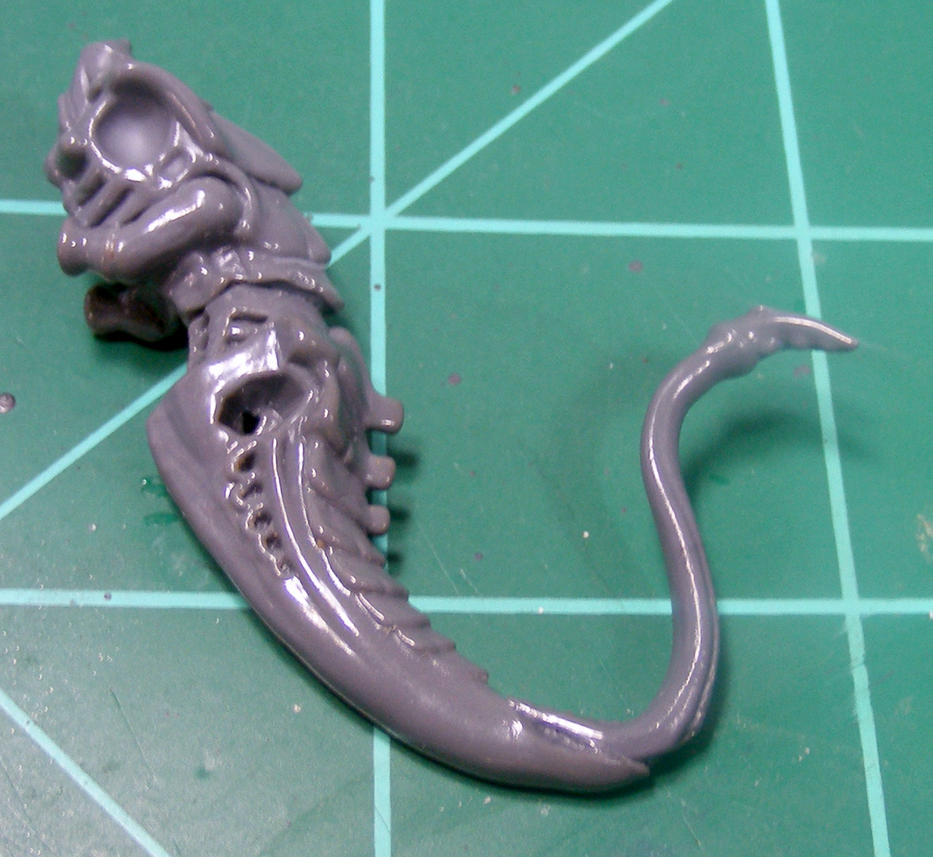
- Warrior tail section. These also come in the warrior kit but if you are going to make warriors or use the warrior bodies for other conversions such as hive guard then you will need to acquire some extra bits. I was able to find these from a UK online bits store for about $1.60 each. Warriors are not super popular in 5th edition so you may be able to get a good deal on these if you look around.
- Mawloc Tongue. I use these as an extension for the tail section, plus the spiky end adds some flavor. These come from the trygon/mawloc kit but only 1 per box so you are unlikely to have enough for 9 zoeys. I found these on a UK online bits store for $0.80 each. As with warriors, mawlocs are not very popular in 5th so you might be able to find some good deals on this piece.
- Trygon head crest. Each trygon/mawloc kit comes with 3 different varieties of crests so if you have any trygons you will likely have extra crests. Like the tongues, however, you probably won't have enough trygon kits to have crests for 9 zoanthropes so you may have to use other means. I was able to find them on eBay for $1.99 each and they also came with the trygon tail and mandible bits. I used several of those extra tail/mandible bits already for my tyrant and doom conversions so that's even more savings there.
- Hormagaunt talons, 2 sets. If this causes you to run out of talons for your hormagaunts, you can always steal some genestealer talons to add to your gaunts. I don't plan on paying extra points for scything talons on my genestealers when I can get toxin sacs so I will have plenty of extras. Again, bonus to variety for your hormagaunts.
- Trygon spikes, 2 per model (6 if you don't like the look of the hormagaunt talons I used.) You get a bunch of extras in the trygon/mawloc kit so they should not be hard to find at all. In case you don't have any for whatever reason it shouldn't be too hard to find a substitute. I use 2 per model but if you don't like the hormagaunt talons then you can just use more of these. You can use small parts of termagant/hormagaunt arms that you chopped up for the other pieces to attach spikes that won't fit right on the model without help. There are plenty of sources for extra spiky things so just get creative!
- 40mm base. One easy source for 40mm bases for tyranid players is the extra ones they throw in for ripper swarms. There are plenty of ways to obtain these.
- Green stuff (not pictured). Used mainly for filling out the head and sculpting the brain, but can also be used to create/modify other parts as necessary. (Thank you, Captain Obvious.)
Total cost per model: around $4.40 assuming you have the termagant/hormagaunt parts and arm spikes and buy everything else. That saves over $20 per model and the savings just get better if you already have any of the trygon, mawloc, or warrior parts that I listed prices for. Even if you do buy all those parts the total cost will be under $40 for 9 zoanthropes, compared to $225 for 9 of the official zoanthrope models. With shipping and green stuff factored in you shouldn't have to pay more than about $50 for everything you need, saving you at least $175 which works out to a discount of 75% or more off of the retail price. YES PLEASE!!! Of course there are ways of saving even more money including trading for bits rather than buying them, substituting other bits, or using green stuff and sculpting skills (that are better than mine) to fill in the pieces that you are missing.
Once you're done drooling over thoughts of what you can do with all the money you will be saving, read on to learn exactly how I went about creating these models.
Once you're done drooling over thoughts of what you can do with all the money you will be saving, read on to learn exactly how I went about creating these models.
The Process:
 |
| Step 1. Talk about split personalities. Have I made that joke before? How about "he's half the man he used to be?" |
 |
| Step 2. We've all seen this TV/movie cliche before. |
2. Glue the head and 'gant torso halves together, but leave them separate for now or later steps will be much more tricky.
 |
| Step 3. Just a little off the top. |
3. The hormagaunt heads usually have horny bits sticking out of their forehead which can cause it to not fit in the trygon head crest. Chop off the top part of the head as necessary. This is where I chopped off the claws on this model since I forgot to do it in step 1.
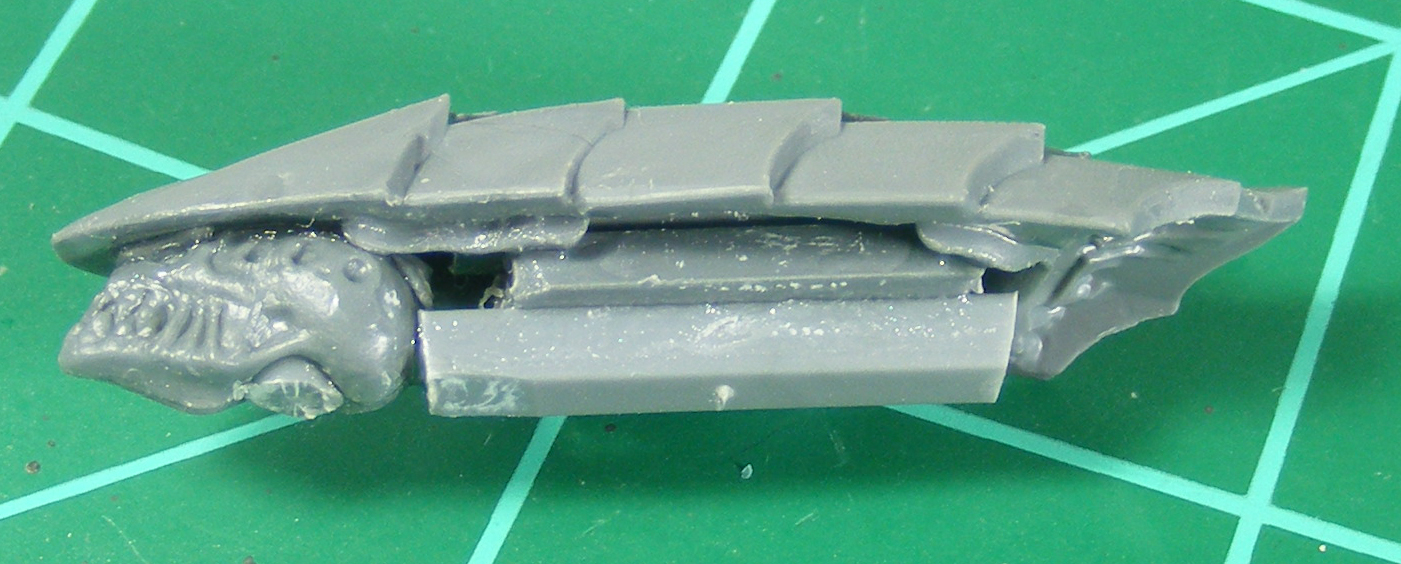 |
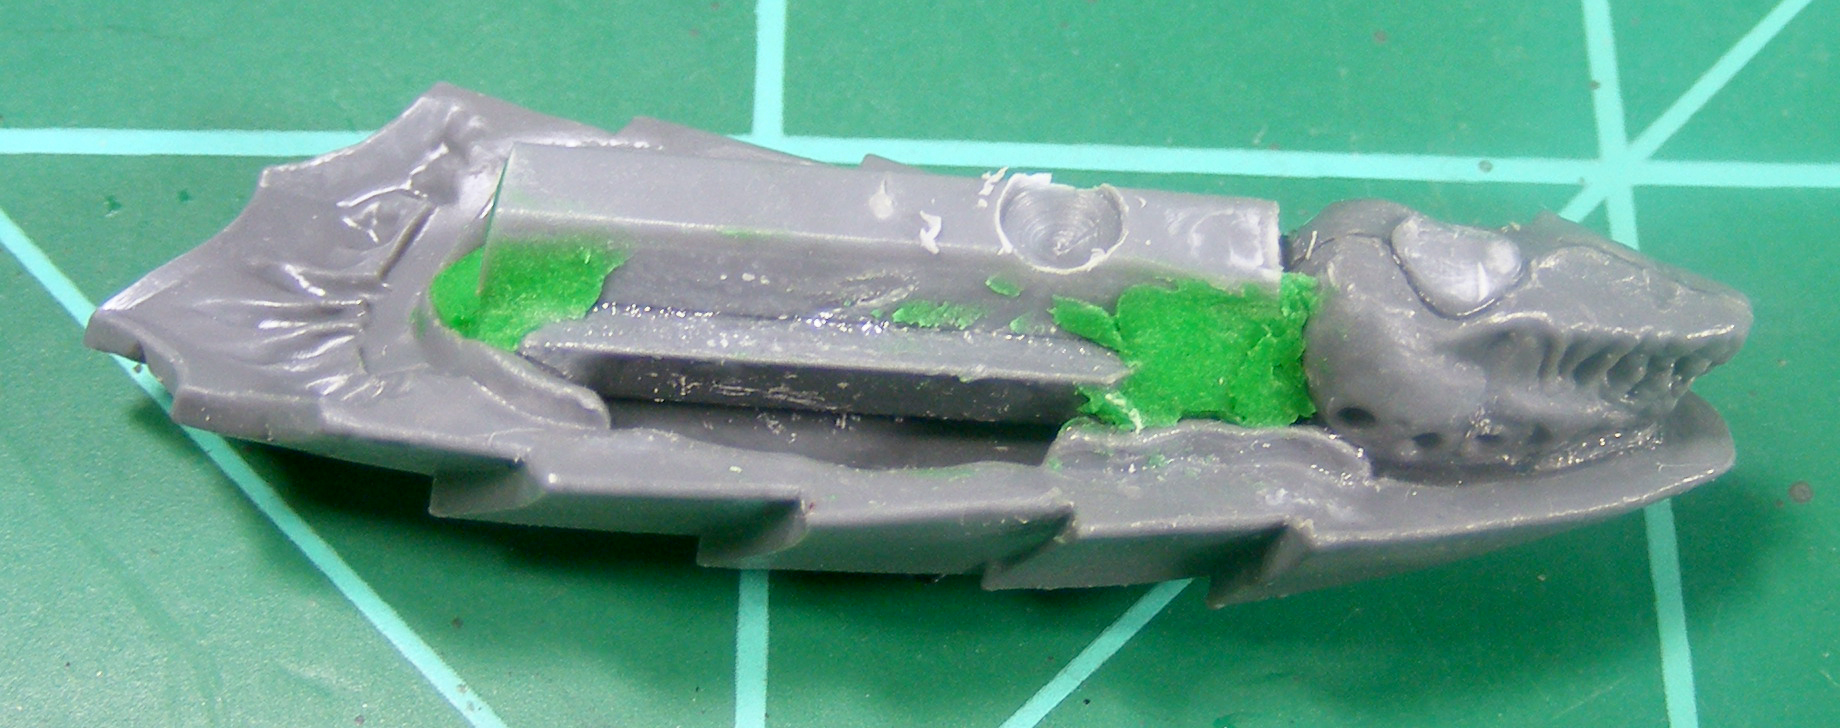
| Step 4. Cheap filler. Also, sprues in the head. |
4. Glue the head in to the front end of the crest. Optional: make this cheap conversion even cheaper by filling in the brain area with spare bits of sprue to save some green stuff.
 |
| Step 5. Dr. Frankenthrope's Monster begins to take shape. |
5. Now shave off part of the warrior tail section and/or the hormagaunt torso to make them fit together. The official model is kind of hunched over forwards so if you are going for something with a similar pose keep that in mind when doing your chopping. I cut the front part of the warrior tail section just above the first "rib" like thing and then shaved the rest to fit that part. If you start off cutting a bit lower, one or two "ribs" down for example, you could have your zoanthrope hunched over even more. Pro tip: the fewer times you have to open your super glue, the longer it will last. I try to glue as many things at once as I can so you can do all the gluing for Steps 4 through 8 at the same time.
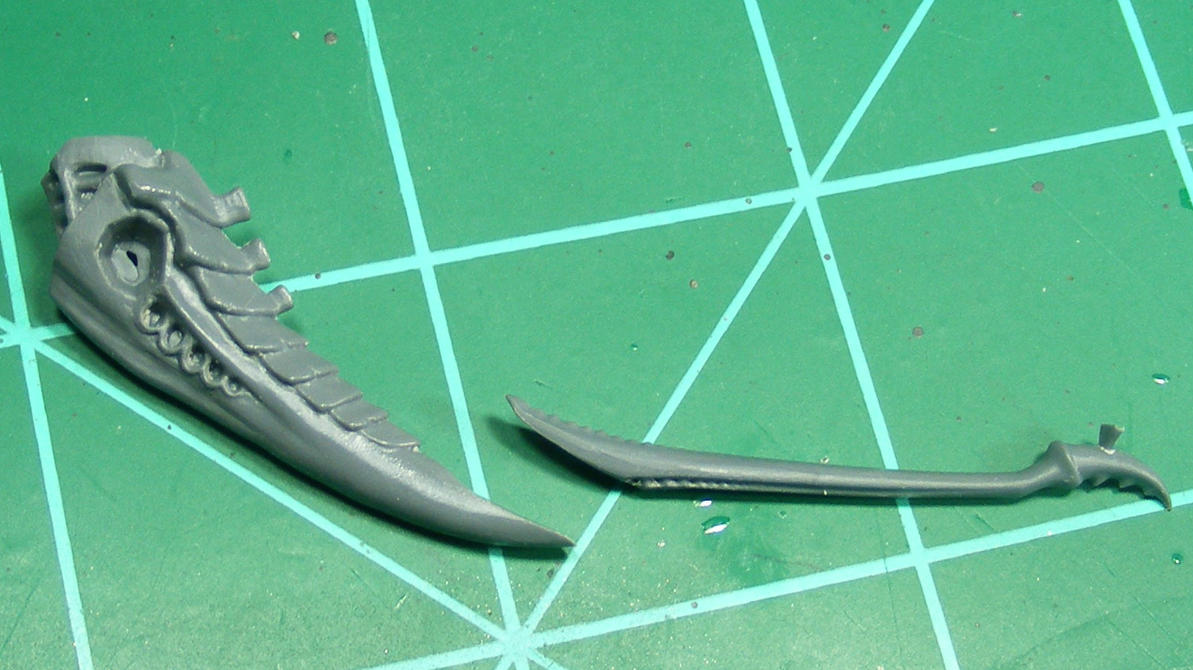 |
| Step 6. Nubbin! |
6. Cut the other end of the tail and the mawloc tongue so they fit together as well. I used a diagonal cut to match them up and keep the maximum amount of length but you can use an easier straight cut or whatever you are comfortable with. You may notice that I left a little nubbin on the end of the tail. That is where the bit attaches to the sprue and if you are going to use heat in later steps to bend the tail this will shrivel up because the spots where a bit attaches to the sprue are always just funky. Leaving a bit of material there will reduce the amount of filling you will have to do after the heat shrinks that spot.
 |
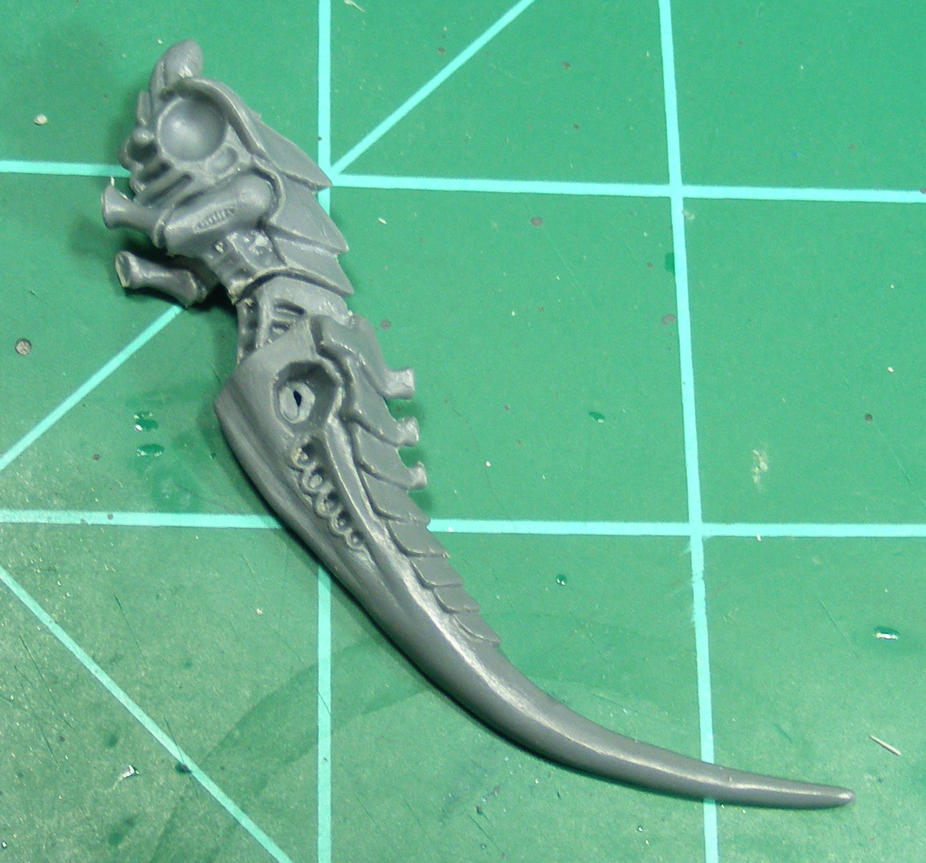
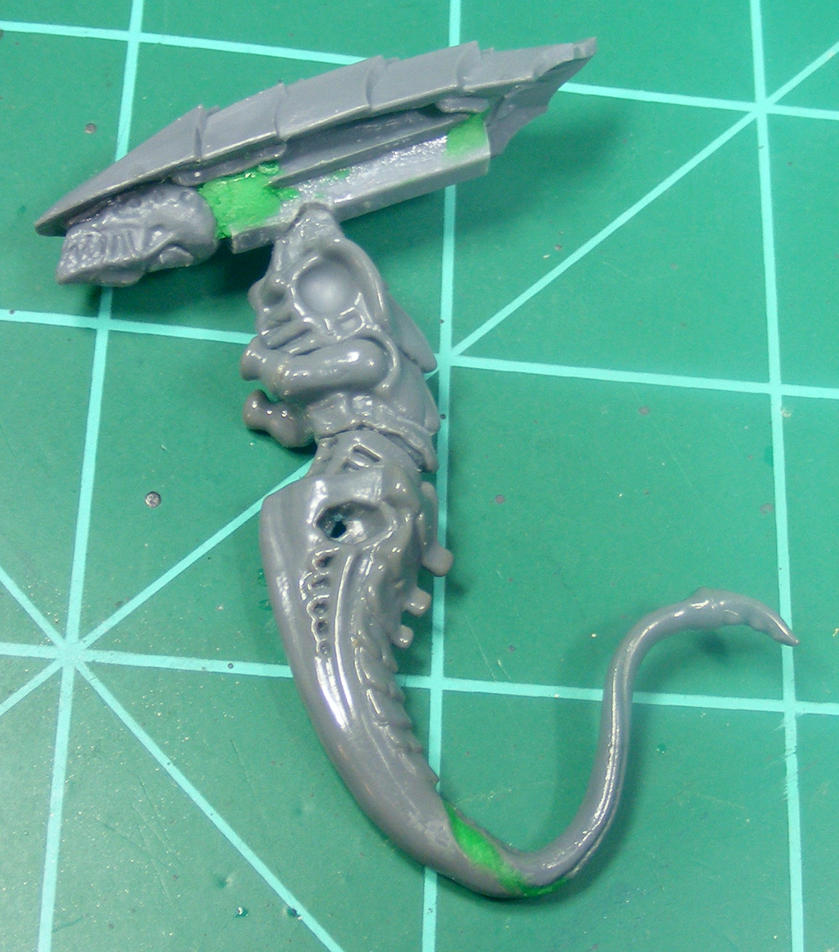
| Step 7. I can't think of any non-dirty jokes for this one. |
7. Glue everything together. I used plastic glue on this model but I found that CA super glue works better. As you can see in the next picture the tail and tongue sections separated a little bit during the heating process and I did not have this issue when using the CA glue.
 |
| Step 8. Is it hot in here or is it just me? |
8. Now that the pieces are together apply some heat to the miniature so you can bed the tail into shape. Obvious safety warnings here, hot things are hot. Don't burn yourself or anyone/anything else or inhale burning plastic. There are a few different ways to do this. I used a Wagner HT1000 Heat Gun on the low heat setting but there are other ways to do this including the Hot Salt Method or even using a candle which is far from optimal but it will do the job in a pinch. It is best to have both hands free while working with heat. You will have more working time with the model before it cools because you won't have to fumble around putting your heat source down without burning anything you don't want burned so things like lighters are not recommended. It doesn't take much exposure for the plastic to heat up enough to be flexible. You don't want to let it sit in the heat too long or else it can start to burn causing issues from releasing toxic fumes to ruining your miniature to burning your house down. This sounds pretty dire and it can be if you are really sloppy with it but it's really very easy to avoid those situations if you just pay attention to what you're doing and keep safety in mind. Remember: hot things are hot.
I found that it takes just a few seconds for the plastic to heat up and I was able to tell when it was ready because it began to slightly bend on its own, whether it's from the heat itself or the fact that I'm using a stream of hot air that could be pushing it around. To really be on the safe side, just apply a tiny amount of heat at a time until the plastic is soft enough to bend. It's pretty simple once you get the hang of it but just to be safe I recommend trying it out on a spare piece of sprue or old junk bits or something before you start working on models you care about. When you heat up the plastic, just use a tool (sculpting tool, pen, toothpick, just something so you don't burn your hands) and push it into the position you want it to be in. If the plastic is still warm when you get it into position and keeps bending out of the shape that you want, just blow on it a little and it will cool down quickly and keep its shape.
I fell in love with my heat gun and used it a lot on many of my tyranids tails so they don't all just stick out straight. There are lots of uses for it and I found that it's a nice tool to add to my hobby arsenal and also a great investment. I got mine for under $25 but I'm sure there are cheaper alternatives out there. You could look at embossing tools as an alternative since they are pretty much the same thing.


9. At this point I used some green stuff to fill in the gaps left by the heating process with a bit left over that I stuck on the head section so it didn't go to waste. This is also where the nubbin from Step 6 comes in handy. You can't really see it from this angle but on the tip of the tongue section there is a small bump left over from where the nubbin melted. If you cut the nubbin off there will be a small gap to fill in. It still requires a bit of work to smooth out but it's easier to file down the nubbin than to fill in a hole. Heheh... nubbin.
 |
| Step 10. That color is so tacky. |
10. This is an optional step but I find it useful to take some blue tac and stick the pieces together to make sure they will all fit together and basically just not look terrible when assembled. It also helps me figure out exactly how to line everything up and what position I want the head to be in.
 |
| Step 11. Holy guide holes, Batman! |
11. I find it easier to glue the head on if I drill a little guide hole first using a 1/16" bit. The guide hole helps keep the head in place while the glue cures rather than trying to keep the neck and a smooth flat piece of plastic aligned. It's like trying to catch a greased up deaf guy.
 |
| Step 12. Super glue: that's one way to keep your head on your shoulders. |
12. Now glue the head on. This will be much easier if you didn't skip step 11.
 |
| Step 13. They're learning! We're all doomed now! |
13. Almost there. Here comes the trickiest part of the whole conversion and while it might look complicated it's actually super easy. Just stick a blob of green stuff to the head and smooth it out into the general shape that you want. Once I had the general shape I just took a toothpick and started making rows of little indentations in the brain matter to make it look like folded brain tissue. Just cover the brain with a random pattern and let it dry, and that's it. Like I said, it's super easy and very simple and the results look great, especially considering how little it takes to get there. Between the brains and the face I had some smooth area so I just made some shallow lines using the end of a rubber clay shaper. I got the brain sculpting technique from page 3 of this thread. I think they went a little more in depth with the technique but I kept it simple with just the single step using a plain old round toothpick.
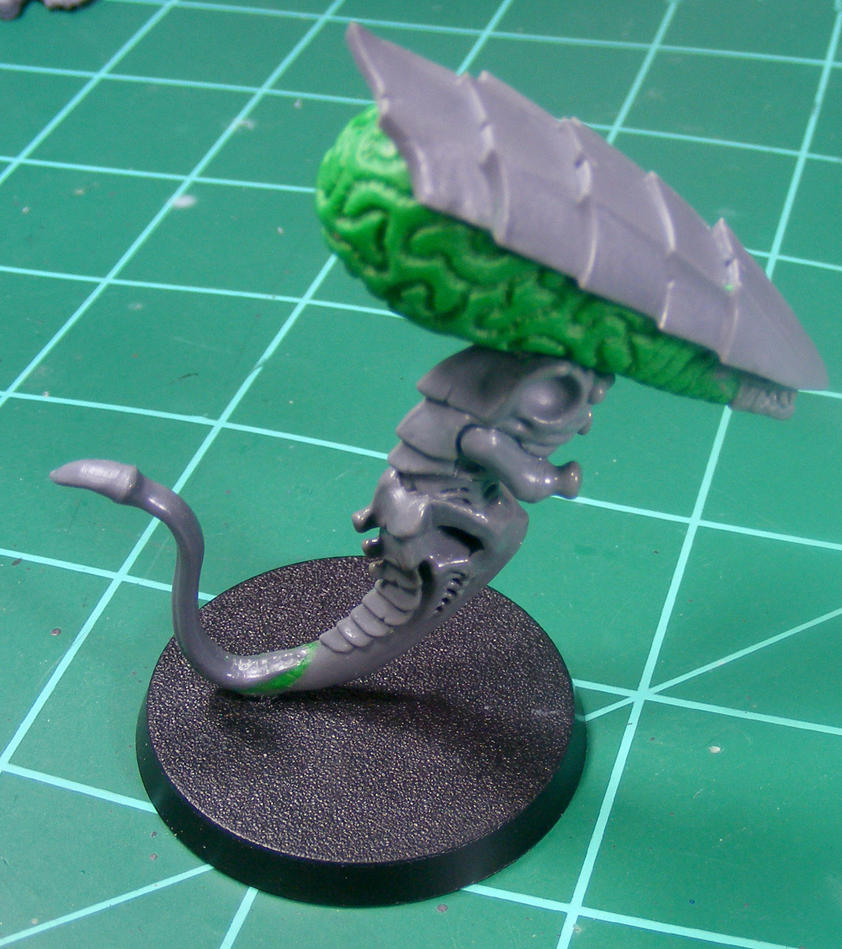
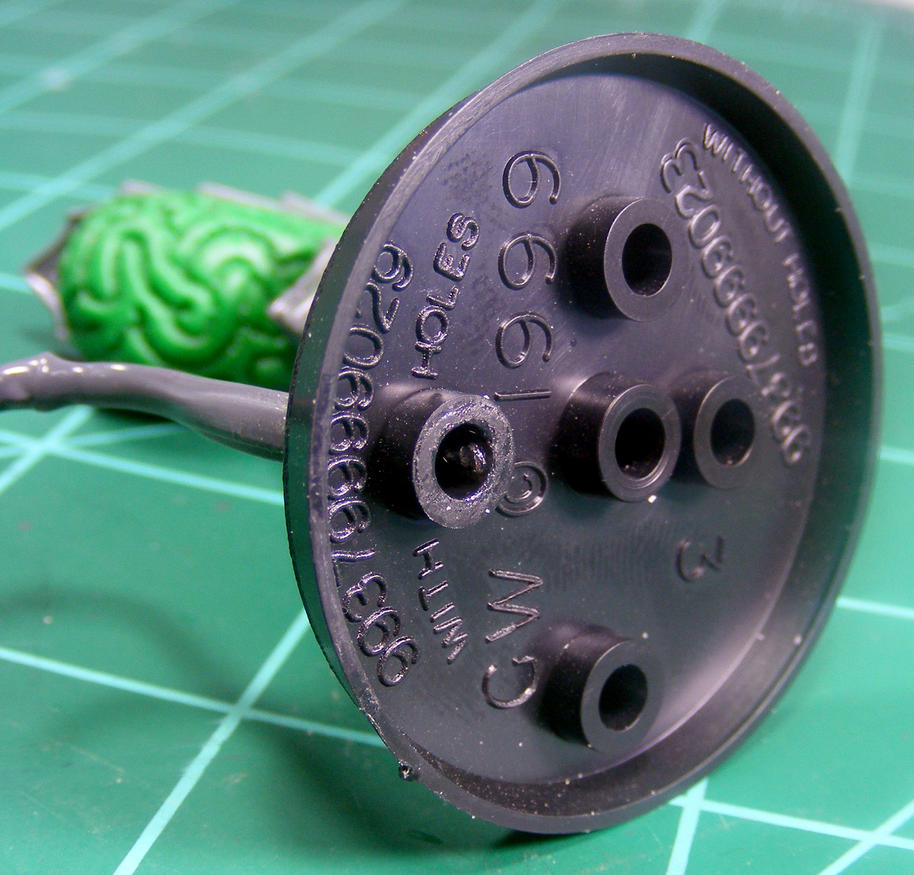
14. Attach to the base. Even though this is a fairly light mostly plastic model there is very little contact area on this model so I pinned it to the base. I was able to align the pin in the tail with one of the holes in the bottom of the base for extra stability since the pin is glued to the side of the hole that you can see in the right picture. Well, you can probably see it if you look closely. Trust me, it's there. Another option is to add some bits or pieces to the base so they Zoanthrope looks like it's floating above wreckage/debris/random terrain features or whatever matches your basing scheme. I am going to go for snow bases and I'm thinking about having a "bubble" around the Zoanthrope where the snow will be packed down and/or pushed out of the way to simulate the psychic field around the zoey that protects it. I might also do something else to raise the pins up a little bit so the model isn't resting its tail on the base itself, but I'll worry about all that later.
 |
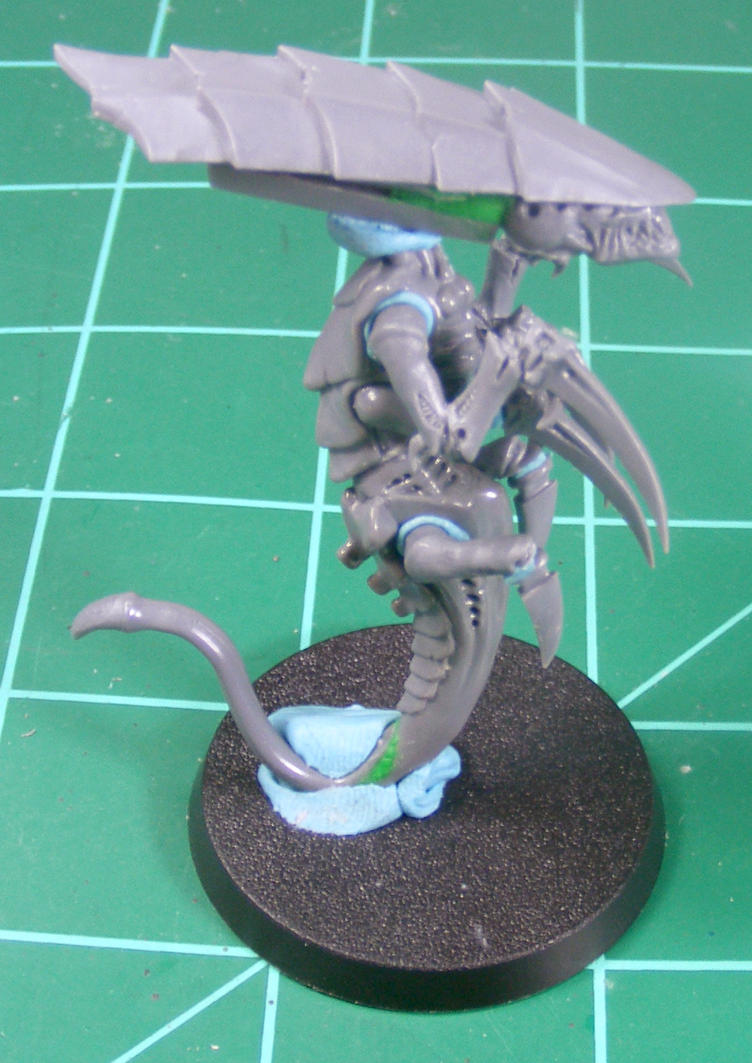
| Step 15 and done. Now be a good little Terran and surrender your biomass to the Hive Mind. It won't hurt a bit. |
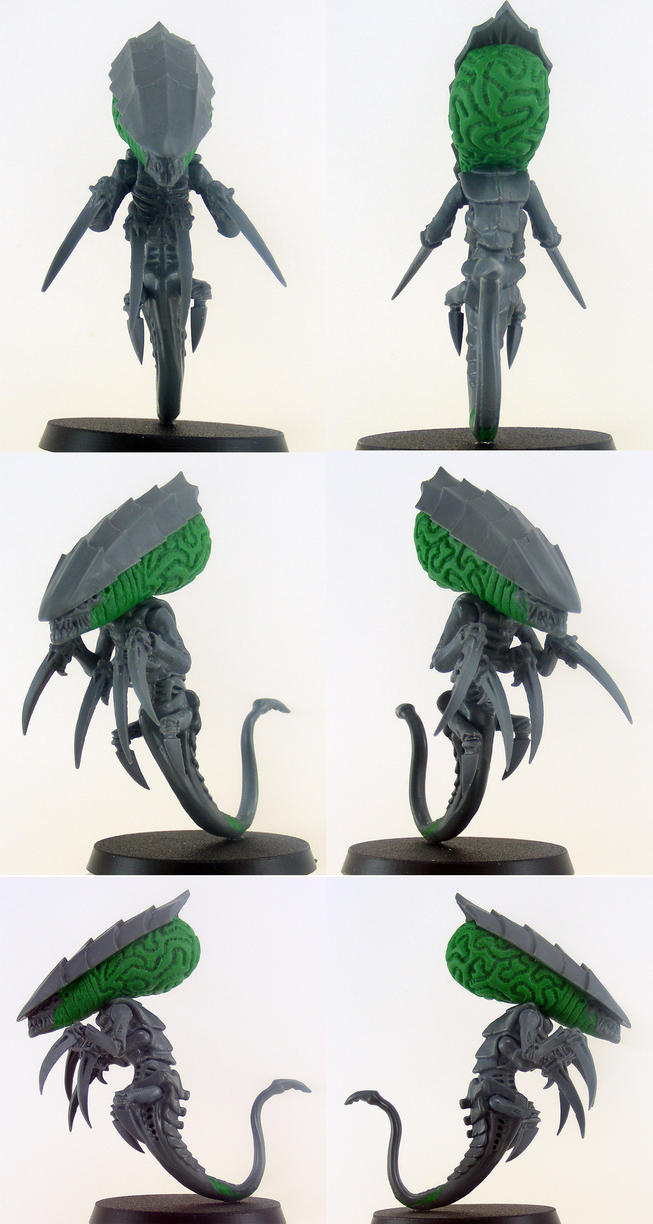
15. Glue on your claws/talons and you're finished. Take a moment to enjoy your handiwork and then put them on the table and blast something into oblivion with your phenomenal cosmic brain powers. Or you could paint them I guess. Either one works.
So there you have it. A simple and not very time consuming way to make your own zoanthropes for less than $5 per model. It took a while to get this tutorial up but I finally got it finished. I hope you enjoyed it and get some good use out of it. Please don't hesitate to leave a comment to let me know what you think or any constructive criticism that you might have that would improve the tutorial. In any case, thanks for stopping by and reading my ramblings. This is Chaosheade signing out. Catch you on the flip side.

No comments:
Post a Comment